Listen to this post as a podcast:
Sponsored by Peergrade and Microsoft Class Notebook
This post contains Amazon Affiliate links. When you make a purchase through these links, Cult of Pedagogy gets a small percentage of the sale at no extra cost to you.
“Those who tell the stories rule the world.” This proverb, attributed to the Hopi Indians, is one I wish I’d known a long time ago, because I would have used it when teaching my students the craft of storytelling. With a well-told story we can help a person see things in an entirely new way. We can forge new relationships and strengthen the ones we already have. We can change a law, inspire a movement, make people care fiercely about things they’d never given a passing thought.
But when we study storytelling with our students, we forget all that. Or at least I did. When my students asked why we read novels and stories, and why we wrote personal narratives and fiction, my defense was pretty lame: I probably said something about the importance of having a shared body of knowledge, or about the enjoyment of losing yourself in a book, or about the benefits of having writing skills in general.
I forgot to talk about the power of story. I didn’t bother to tell them that the ability to tell a captivating story is one of the things that makes human beings extraordinary. It’s how we connect to each other. It’s something to celebrate, to study, to perfect. If we’re going to talk about how to teach students to write stories, we should start by thinking about why we tell stories at all. If we can pass that on to our students, then we will be going beyond a school assignment; we will be doing something transcendent.
Now. How do we get them to write those stories? I’m going to share the process I used for teaching narrative writing. I used this process with middle school students, but it would work with most age groups.
A Note About Form: Personal Narrative or Short Story?
When teaching narrative writing, many teachers separate personal narratives from short stories. In my own classroom, I tended to avoid having my students write short stories because personal narratives were more accessible. I could usually get students to write about something that really happened, while it was more challenging to get them to make something up from scratch.
In the “real” world of writers, though, the main thing that separates memoir from fiction is labeling: A writer might base a novel heavily on personal experiences, but write it all in third person and change the names of characters to protect the identities of people in real life. Another writer might create a short story in first person that reads like a personal narrative, but is entirely fictional. Just last weekend my husband and I watched the movie Lion and were glued to the screen the whole time, knowing it was based on a true story. James Frey’s book A Million Little Pieces sold millions of copies as a memoir but was later found to contain more than a little bit of fiction. Then there are unique books like Curtis Sittenfeld’s brilliant novel American Wife, based heavily on the early life of Laura Bush but written in first person, with fictional names and settings, and labeled as a work of fiction. The line between fact and fiction has always been really, really blurry, but the common thread running through all of it is good storytelling.
With that in mind, the process for teaching narrative writing can be exactly the same for writing personal narratives or short stories; it’s the same skill set. So if you think your students can handle the freedom, you might decide to let them choose personal narrative or fiction for a narrative writing assignment, or simply tell them that whether the story is true doesn’t matter, as long as they are telling a good one.
Here are some examples of what that kind of flexibility could allow:
- A student might tell a true story from their own experience, but write it as if it were a fiction piece, with fictional characters, in third person.
- A student might create a completely fictional story, but tell it in first person, which would give it the same feel as a personal narrative.
- A student might tell a true story that happened to someone else, but write it in first person, as if they were that person. For example, I could write about my grandmother’s experience of getting lost as a child, but I might write it in her voice.
If we aren’t too restrictive about what we call these pieces, and we talk about different possibilities with our students, we can end up with lots of interesting outcomes. Meanwhile, we’re still teaching students the craft of narrative writing.
A Note About Process: Write With Your Students
One of the most powerful techniques I used as a writing teacher was to do my students’ writing assignments with them. I would start my own draft at the same time as they did, composing “live” on the classroom projector, and doing a lot of thinking out loud so they could see all the decisions a writer has to make.
The most helpful parts for them to observe were the early drafting stage, where I just scratched out whatever came to me in messy, run-on sentences, and the revision stage, where I crossed things out, rearranged, and made tons of notes on my writing. I have seen over and over again how witnessing that process can really help to unlock a student’s understanding of how writing actually gets made.
A Narrative Writing Unit Plan
Before I get into these steps, I should note that there is no one right way to teach narrative writing, and plenty of accomplished teachers are doing it differently and getting great results. This just happens to be a process that has worked for me.
Step 1: Show Students That Stories Are Everywhere
Getting our students to tell stories should be easy. They hear and tell stories all the time. But when they actually have to put words on paper, they forget their storytelling abilities: They can’t think of a topic. They omit relevant details, but go on and on about irrelevant ones. Their dialogue is bland. They can’t figure out how to start. They can’t figure out how to end.
So the first step in getting good narrative writing from students is to help them see that they are already telling stories every day. They gather at lockers to talk about that thing that happened over the weekend. They sit at lunch and describe an argument they had with a sibling. Without even thinking about it, they begin sentences with “This one time…” and launch into stories about their earlier childhood experiences. Students are natural storytellers; learning how to do it well on paper is simply a matter of studying good models, then imitating what those writers do.
So start off the unit by getting students to tell their stories. In journal quick-writes, think-pair-shares, or by playing a game like Concentric Circles, prompt them to tell some of their own brief stories: A time they were embarrassed. A time they lost something. A time they didn’t get to do something they really wanted to do. By telling their own short anecdotes, they will grow more comfortable and confident in their storytelling abilities. They will also be generating a list of topic ideas. And by listening to the stories of their classmates, they will be adding onto that list and remembering more of their own stories.
And remember to tell some of your own. Besides being a good way to bond with students, sharing your stories will help them see more possibilities for the ones they can tell.
Step 2: Study the Structure of a Story
Now that students have a good library of their own personal stories pulled into short-term memory, shift your focus to a more formal study of what a story looks like.
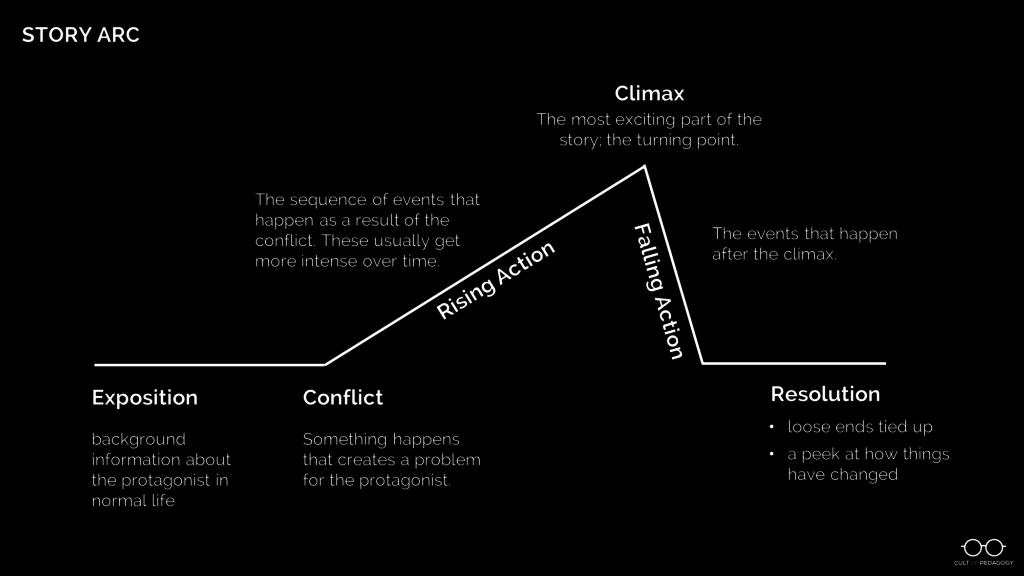
Use a diagram to show students a typical story arc like the one below. Then, using a simple story—like this Coca Cola commercial—fill out the story arc with the components from that story. Once students have seen this story mapped out, have them try it with another one, like a story you’ve read in class, a whole novel, or another short video.
Step 3: Introduce the Assignment
Up to this point, students have been immersed in storytelling. Now give them specific instructions for what they are going to do. Share your assignment rubric so they understand the criteria that will be used to evaluate them; it should be ready and transparent right from the beginning of the unit. As always, I recommend using a single point rubric for this.
Step 4: Read Models
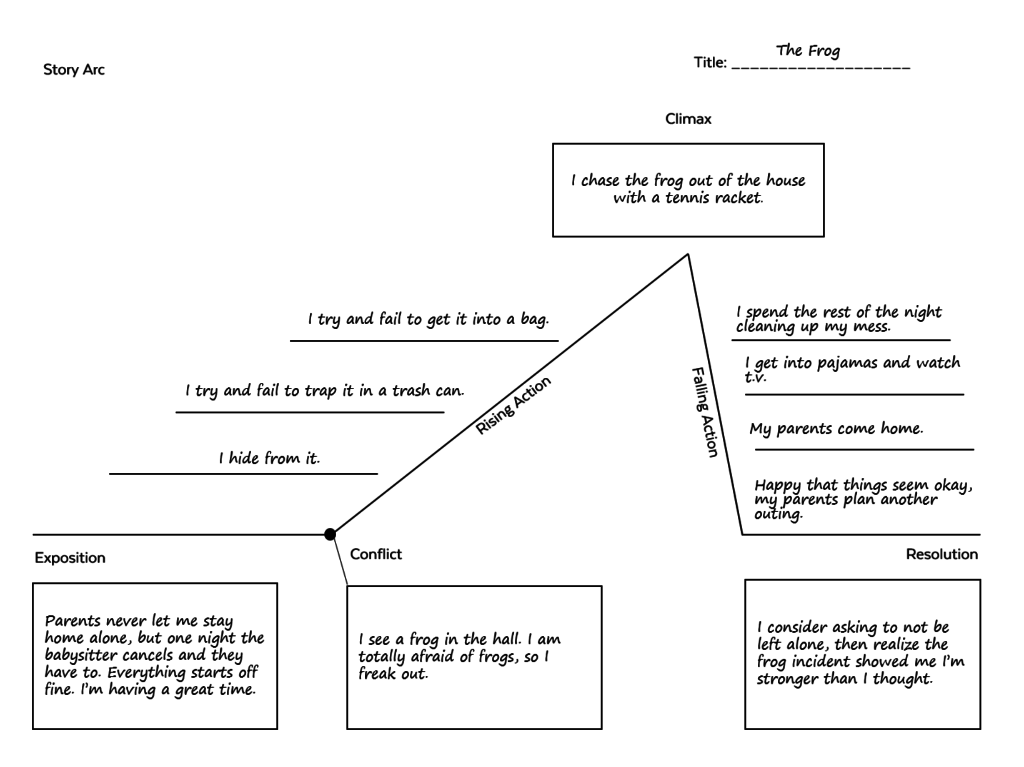
Once the parameters of the assignment have been explained, have students read at least one model story, a mentor text that exemplifies the qualities you’re looking for. This should be a story on a topic your students can kind of relate to, something they could see themselves writing. For my narrative writing unit (see the end of this post), I wrote a story called “Frog” about a 13-year-old girl who finally gets to stay home alone, then finds a frog in her house and gets completely freaked out, which basically ruins the fun she was planning for the night.
They will be reading this model as writers, looking at how the author shaped the text for a purpose, so that they can use those same strategies in their own writing. Have them look at your rubric and find places in the model that illustrate the qualities listed in the rubric. Then have them complete a story arc for the model so they can see the underlying structure.
Ideally, your students will have already read lots of different stories to look to as models. If that isn’t the case, this list of narrative texts recommended by Cult of Pedagogy followers on Twitter would be a good place to browse for titles that might be right for your students. Keep in mind that we have not read most of these stories, so be sure to read them first before adopting them for classroom use.
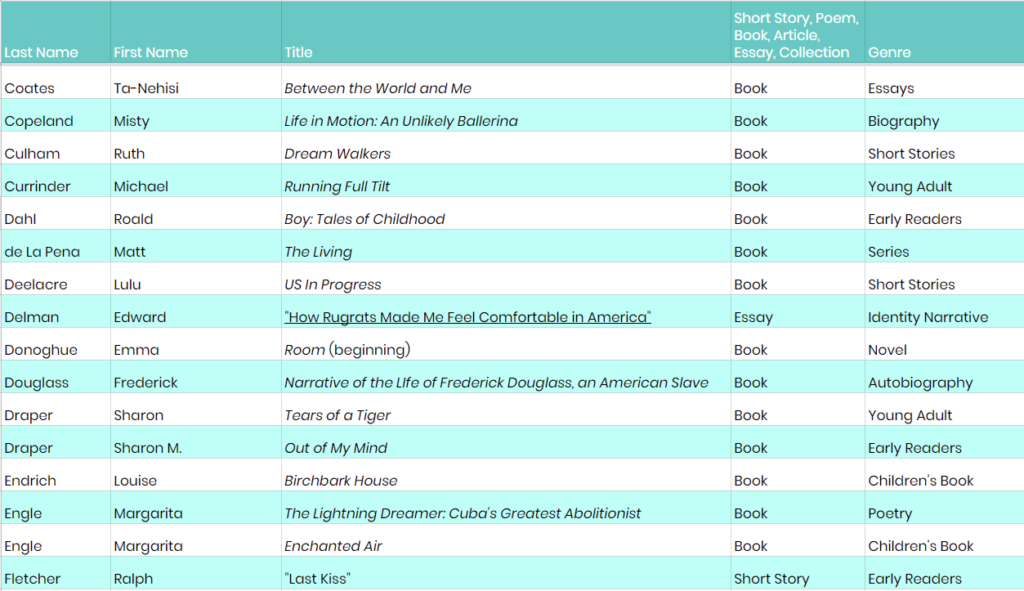
Click the image above to view the full list of narrative texts recommended by Cult of Pedagogy followers on Twitter. If you have a suggestion for the list, please email us through our contact page.
Step 5: Story Mapping
At this point, students will need to decide what they are going to write about. If they are stuck for a topic, have them just pick something they can write about, even if it’s not the most captivating story in the world. A skilled writer could tell a great story about deciding what to have for lunch. If they are using the skills of narrative writing, the topic isn’t as important as the execution.
Have students complete a basic story arc for their chosen topic using a diagram like the one below. This will help them make sure that they actually have a story to tell, with an identifiable problem, a sequence of events that build to a climax, and some kind of resolution, where something is different by the end. Again, if you are writing with your students, this would be an important step to model for them with your own story-in-progress.
Step 6: Quick Drafts
Now, have students get their chosen story down on paper as quickly as possible: This could be basically a long paragraph that would read almost like a summary, but it would contain all the major parts of the story. Model this step with your own story, so they can see that you are not shooting for perfection in any way. What you want is a working draft, a starting point, something to build on for later, rather than a blank page (or screen) to stare at.
Step 7: Plan the Pacing
Now that the story has been born in raw form, students can begin to shape it. This would be a good time for a lesson on pacing, where students look at how writers expand some moments to create drama and shrink other moments so that the story doesn’t drag. Creating a diagram like the one below forces a writer to decide how much space to devote to all of the events in the story.
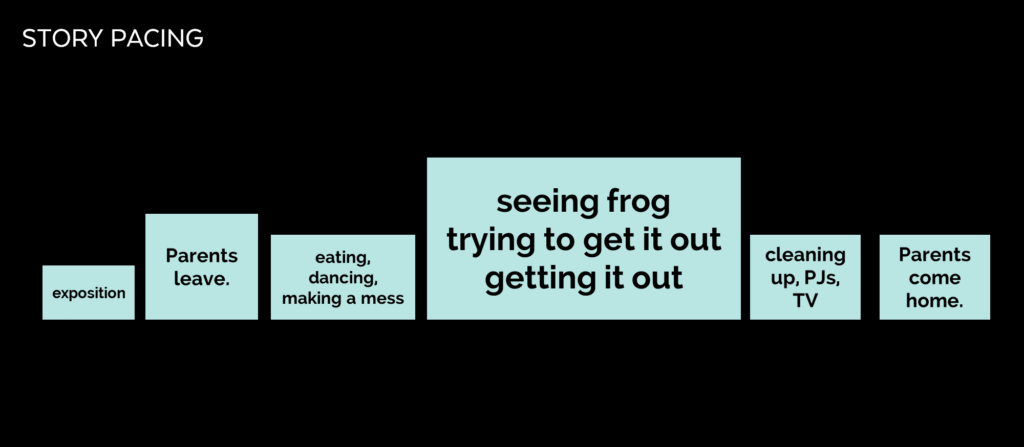
Before students write a full draft, have them plan out the events in their story with a pacing diagram, a visual representation of how much “space” each part of the story is going to take up.
Step 8: Long Drafts
With a good plan in hand, students can now slow down and write a proper draft, expanding the sections of their story that they plan to really draw out and adding in more of the details that they left out in the quick draft.
Step 9: Workshop
Once students have a decent rough draft—something that has a basic beginning, middle, and end, with some discernible rising action, a climax of some kind, and a resolution, you’re ready to shift into full-on workshop mode. I would do this for at least a week: Start class with a short mini-lesson on some aspect of narrative writing craft, then give students the rest of the period to write, conference with you, and collaborate with their peers. During that time, they should focus some of their attention on applying the skill they learned in the mini-lesson to their drafts, so they will improve a little bit every day.
Topics for mini-lessons can include:
- How to weave exposition into your story so you don’t give readers an “information dump”
- How to carefully select dialogue to create good scenes, rather than quoting everything in a conversation
- How to punctuate and format dialogue so that it imitates the natural flow of a conversation
- How to describe things using sensory details and figurative language; also, what to describe…students too often give lots of irrelevant detail
- How to choose precise nouns and vivid verbs, use a variety of sentence lengths and structures, and add transitional words, phrases, and features to help the reader follow along
- How to start, end, and title a story
Step 10: Final Revisions and Edits
As the unit nears its end, students should be shifting away from revision, in which they alter the content of a piece, toward editing, where they make smaller changes to the mechanics of the writing. Make sure students understand the difference between the two: They should not be correcting each other’s spelling and punctuation in the early stages of this process, when the focus should be on shaping a better story.
One of the most effective strategies for revision and editing is to have students read their stories out loud. In the early stages, this will reveal places where information is missing or things get confusing. Later, more read-alouds will help them immediately find missing words, unintentional repetitions, and sentences that just “sound weird.” So get your students to read their work out loud frequently. It also helps to print stories on paper: For some reason, seeing the words in print helps us notice things we didn’t see on the screen.
To get the most from peer review, where students read and comment on each other’s work, more modeling from you is essential: Pull up a sample piece of writing and show students how to give specific feedback that helps, rather than simply writing “good detail” or “needs more detail,” the two comments I saw exchanged most often on students’ peer-reviewed papers.
Step 11: Final Copies and Publication
Once revision and peer review are done, students will hand in their final copies. If you don’t want to get stuck with 100-plus papers to grade, consider using Catlin Tucker’s station rotation model, which keeps all the grading in class. And when you do return stories with your own feedback, try using Kristy Louden’s delayed grade strategy, where students don’t see their final grade until they have read your written feedback.
Beyond the standard hand-in-for-a-grade, consider other ways to have students publish their stories. Here are some options:
- Stories could be published as individual pages on a collaborative website or blog.
- Students could create illustrated e-books out of their stories.
- Students could create a slideshow to accompany their stories and record them as digital storytelling videos. This could be done with a tool like Screencastify or Screencast-O-Matic.
So this is what worked for me. If you’ve struggled to get good stories from your students, try some or all of these techniques next time. I think you’ll find that all of your students have some pretty interesting stories to tell. Helping them tell their stories well is a gift that will serve them for many years after they leave your classroom. 
Want this unit ready-made?
If you’re a writing teacher in grades 7-12 and you’d like a classroom-ready unit like the one described above, including slideshow mini-lessons on 14 areas of narrative craft, a sample narrative piece, editable rubrics, and other supplemental materials to guide students through every stage of the process, take a look at my Narrative Writing unit. Just click on the image below and you’ll be taken to a page where you can read more and see a detailed preview of what’s included.
Join my mailing list and get weekly tips, tools, and inspiration that will make your teaching more effective and fun. You’ll get access to my members-only library of free downloads, including 20 Ways to Cut Your Grading Time in Half, the e-booklet that has helped thousands of teachers save time on grading. Over 50,000 teachers have already joined—come on in!
